Saturday, January 23, 2010

The Roof

The roof over the garage and one of the bedrooms had a different type of tiling, which broke up the lovely line of the slope.  Also, rain got in under the tiles when it blew in from the east.  So we decided the roof needed changing to match the rest.

Like the cottage, the new tiling consists of a flat under tile with two curved tiles lipped over the top.  They match the old roof tiles pretty well, though we may need to paint some of the pinker ones with yoghurt to encourage the mold to grow quickly and dull them down.

The builders removed the roof just as it started to snow and worked through heavy rain to complete it - fortunately the silver underlay went down before the worst of the weather.

The original roof with the change in tiling over the garage and bedroom


The roof removed during the snow


The stages of building the new roof


The finished roof


Monday, January 18, 2010

The Kitchen is Transformed

The old plasterboard between the kitchen and the study has been removed and the bare struts of the colombage between the two rooms are visible.  These will be covered on the kitchen side by fresh plasterboard (because we want smooth walls in the kitchen - easier to keep clean) and left open in the study.


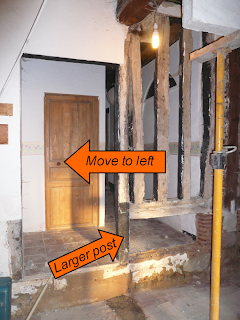
The heavy beam across the kitchen now has a more robust post supporting it. The colombage that was on the righthand side of the doorway has been moved left so now there is a straight corridor through to the back of the house, rather than the strange dog leg that went past the study. 


To the right of the new corridor there is a small piece of colombage with brick filling between the vertical struts.  We're going to keep that visible to show how this part of the house was constructed.  In moving the struts around we were left with a narrow gap, which one of the builders has lovingly filled in the same style as the original.

The hole for the new kitchen window has been made and the lintel is in place.  We had fun deciding the exact position of the window.  It will be above the sink and directly opposite the chimney breast.  That was the easy bit.  The window is in the west wall which has two other windows further along the house. We wanted the tops of all three to be in line - for symmetry.  But it was not that easy to measure, because the house is built on a slope and the wall has wisteria all over it. So one of the builders went up a ladder and using a spirit level drew a line from the existing windows to where he thought the kitchen window should be.  But it looked wrong. 

We all had a go, with tape measures and spirit levels and pieces of string. That's when we realised that the roof  line wasn't straight.  It dips over the kitchen. And the study window is crooked. So we decided to make the hole for the kitchen window slightly lower and hope for the best.

A big chunk of the white wisteria had to go, which I regret.  I'm hoping that we will be able to train the new growth back. Imagine, warm summer evenings in the kitchen looking west at the setting sun and the sweet smell of wisteria drifting through the open window.

West wall of the house with the hole for the new kitchen window


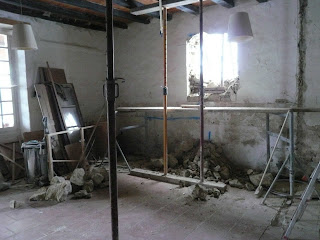
The inside of the kitchen looking at the hole for the new window 


View out of what will be the new kitchen window - looking west


Monday, January 11, 2010

These Last Few Days ...

... the house has been a hive of activity with builders in the lounge (where the stone steps are now laid) the gite/entance hall (where the new doorway in what was the bathroom has been knocked through) and the kitchen.

The breeze-block bit of  kitchen wall that hid the water heater is down.  And suddenly we have a kitchen with good proportions.  I stand in the corner where the water heater cupboard used to be and look towards the chimney breast. At last, the great fireplace is gracefully where it should be - in the middle of  the wall.  And then I realise we are about to destroy this new open aspect by putting up a new wall to support the big beam that crosses the room.  The new supporting wall seemed like a good idea because, with a new door, it would have created a lobby from the kitchen into the utility room that will have the washing machine and the new water heater. But to build the supporting wall would be a major mistake.

We need to support the beam some way though.  It is vast and at present, now that the breeze-block wall is down, is only supported by much too small a post in the colombage.  Perhaps we can add another post alongside the one in the colombage to help take the weight?

Also, there is a change in level from the back of the house into the kitchen.  How will we manage the steps down and the doorway?

I tentatively call Monsieur B and leave a message. We are somewhat nervous of making further changes as we signed a long contract with him which included all sorts of serious clauses about his right as project manager to charge us more (and if necessary walk away from the job) if we mess him around and alter the plans once agreed.  But so far he has taken our requests in his stride and with good grace.

In theory we have a site meeting at 8.30 tomorrow morning with him and the builder to discuss what to do. Hope they manage to get down our drive in the snow.

Original plan: to have a "lobby" from the kitchen to the utility area and back of the house


Revised plan: to leave the kitchen open, to move the door to the corridor and to add another post to support the beam 


View from corner where water heater cupboard  used to be, looking towards fireplace which backs onto the dining room


Kitchen beam at present only supported by a small post in the colombage


Wednesday, January 6, 2010

We've Changed our Minds (Again)

... about what to do with the lounge back wall.

Monsieur G (who is in charge of the major structural stuff) said the mud torchis in the lounge colombage was not salvageable and we agreed it would come out to be replaced with horizontal flat bricks and render.

I popped up to the house last week to check on progress to find the mud had all been removed leaving just the vertical beams.  The builders had a light shining behind the beams casting interesting shadows and suddenly it seemed a shame to fill them all in again.

So we had a site meeting yesterday and we've agreed the beams will be left open, the corridor behind the wall will be plastered and will have a ceiling (at the moment it's open up to the roof tiles). We'll install a door  from the gite into the corridor to help keep down the draughts behind the open colombage.

The big stones are now in place under the wooden beams and we'll have stone steps coming down into the lounge from the gite/entrance hall.